On this page can be found brief installation instruction.
Before installing a plugin, please be sure that you have a GLS account, and that it is connected to the new GLS API. You can check this with your GLS customer support agent.
Installation procedure for GLS Plugin
- Download plugin from here
- WordPress Plugin Uploader
- FTP Plugin Uploader
- License Activation
- GLS Account informations
WordPress Plugin Uploader
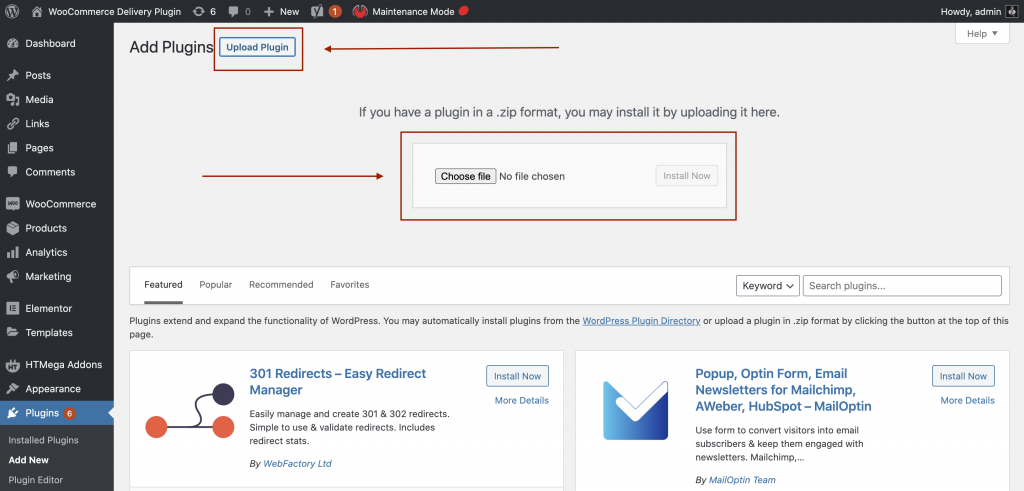
You can install WooCommerce GLS Print Label via the WordPress plugin uploader without unzipping the file.
- Log into your WordPress admin panel
- Navigate to Plugins > Add New
- Click Upload
- Click Choose File and select the WooCommerce GLS Print Label download zip.
- Click Install Now.

After installation please click on:
- Activate button
Or go to:
- Plugins
- Installed Plugins
- Search for GLS Print Label plugins
- Click Activate

FTP
You can also install WooCommerce GLS Print Label via FTP
- Decompress the .zip file you downloaded from CodeCanyon.
- Find the
wp-gls-print-label.zipfolder (this directory is created when you unzip the file). - Upload the
wp-gls-print-label.zipfolder to yourwp-content/pluginsdirectory. - Navigate to your Control Panel: Plugins
- Under WooCommerce GLS Print Label, click Activate
License Activation
Before using a plugin, you need to activate it:
Please Activate plugin so it can work properly. Go to Woocommerce Settings > GLS Settings

GLS plugin is connected to a domain. So it means that one plugin licence can work only with one eCommerce domain. If you need multistores, please check product options from our licence plan for our pricing lists.

Licence can be bought here.
After inserting licence information, please click on a blue Save changes button.

GLS plugin can be tested before buying.
For the test purpose please use the following information:
- License Key:
- Phone No.
GLS Account Informations
Under the WooCommerce -> Settings -> GLS Settings
Fill the required data which are provided from your GLS Customer Support Agent:
Obligatory data are:
- Username
- Password
- ClientID

After inserting the data, click on the blue Save changes button.
You can proceed to the Test page.


